We learned all the basic building skills needed to construct a simple cob home, & made a bunch of new friends & connections.
It's summertime here at the moment, the weather was pretty hot (though thankfully cool at night), & there were fires not far away, but we worked flat out for 6 days, & completed the drainage, foundations & the cob walls.
Brief summary of how we did it -
We started by cleaning up the drainage trench, filling it with gravel, & laying ag pipe for drainage.
Next we layed the lime mortar, blue stone, & clay bricks, this is the foundation that gives you a sturdy base to build on, & separates the cob walls from direct contact with the earth to avoid any problems with rising damp.
At this point we had already mixed lots of cob. We made our cob mixes by stomping clay, sharp sand, straw, & water. We built the walls as high as we could without the walls slumping (cob needs time to dry a little between layers, you can only build so high in a day or it will sink & bulge) We used sticks cut to 300mm to check the width of the walls as we were building.
In the mornings we would check the walls, & used a hand saw to cut off any bulging areas inside & out to make the walls as straight & level as possible. Although cob is low tech, the walls can fall if they are too messy & become overbalanced.
Soon we added the door frame, & some windows, these were all leveled & braced in place. The edges are 'porcupined' with nails so they will lock into the cob wall, lintels & internal braces are used to avoid bowing under the weight of the cob. Anything added into a cob wall must first be wet with a clay slip to help the cob adhere properly.
Some coloured bottles were added into the wall, which later formed the face of an owl, & some simple shelves were build into the walls.
As we got higher some extra windows were added for more light, & we continued mixing & laying cob until we reached the final height. We were also able to hide leftover bricks in the cob wall as we built, this means less cob is needed, & you can get rid of some unused materials.

The paddock we camped in for the week :)

Early stages of the building. Unfortunately my phone was flat on the first couple of days, so I couldn't take photos right from the start :/
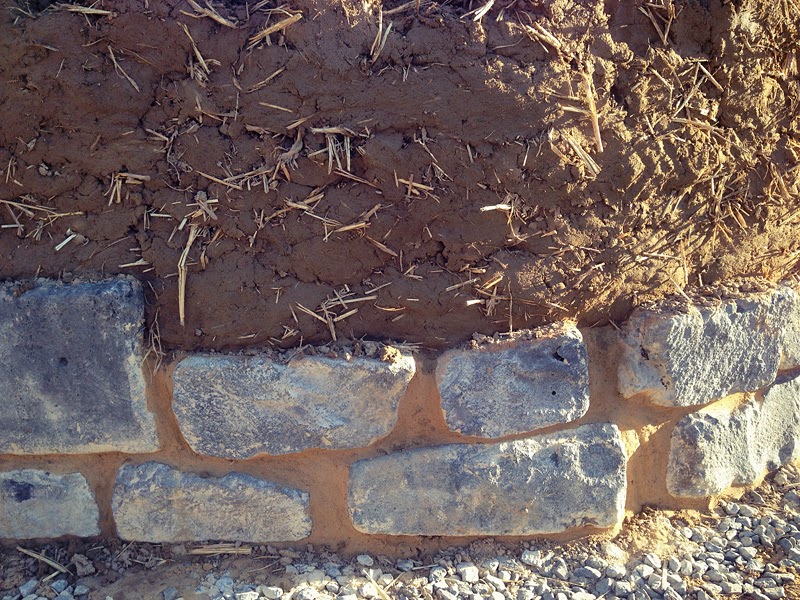
Close up of the blue stone foundation, lime mortar, & the cob wall. Below that is the drainage ditch filled with gravel & agricultural pipe ('ag pipe'), which runs down away from the building, & opens out into to paddock.

On the inside you can see regular red bricks, these were used to widen the foundation to accommodate the cob walls. Regular bricks are much cheaper than blue stone, & will be covered once the floor is layed :)
You can also see some of the 300mm sticks we used for checking the width of wall.

A window that has been leveled & braced into place. The nails along the edges will help it lock into the cob, it's known as 'porcupining'

The door frame is braced on the inside to prevent the weight of the cob bowing it, so the door will fit in properly at the end. The frame is porcupined, & some extra pieces of wood are attached to the sides of the frame & porcupined as well for extra stability.

The bottles were added straight into the wall, with slip straw running across the top for strength & protection to avoid the bottles breaking under the weight of the cob. This area was also given extra time to dry so the section above the bottles was more sturdy.

This is the lovely owl sculpture added around the bottles once the wall was higher. It is made of the same cob mix as the rest of the wall, attached by roughing the surface of the wall, adding some clay slip, & attaching sculpted cob.

This is the completed structure on the final day :D
The walls are at full height, all the windows are in, & external bracing has been removed.

The inside of the building standing in the door frame.
A roof with eaves will be built on in a weeks time, & once the earth floor is layed the bricks at the bottom will no longer be visible. The final step will be rendering the walls, which will make them neat, smooth, & more resistant to weather, etc.

Simple shelves built into the cob wall, & a little cob kiwi bird struttin'

My favorite window all cobed in :)
Building with cob is very low tech, & very labor intensive. Once you know the basics, you can build a beautiful natural home with family & friends. It's definitely best to have at least one person with lots of experience on the site, but because cob is quite a simple technique anyone can easily pick up the basics & help with building. :)
As you can see this is just a small room, which would be great for woofers, etc, but it has no electrics or plumbing, we are hoping to attend more workshops to learn more about that, & maybe some different building techniques too, I'm particularly interested in 'slip straw', also called 'light clay'.
Hopefully in the few years I'll be working on my own natural home!


No comments:
Post a Comment